Template UI Command
Worker Template command is a kind of lightweight extension command running in web worker (30KB+), following pre-defined template, making it easy to develop extension with consistent GUI.
Installation
Prerequisites:
Run the project scaffolding command to create a new project with Worker Template Extension.
npm init kunkun@latest # choose the templateAfter creating a template project, you need to edit package.json.
Development
Change Dev Extension Path
Dev extensions are not installed together with the extensions installed from the extension store.
They can be anywhere on your file system, but you need to tell KK where to find them.
Go to Settings -> Developer -> Installation, there is a field to Set Dev Extension Path.
Choose the parent folder containing your extension project.
If you are using the KunkunExtensions repo, set it to KunkunExtensions/extensions.
DirectoryKunkunExtensions
Directoryextensions
Directoryext-qrcode
- package.json
- dist
Directoryext-jwt
- package.json
- dist
Now go back to the main search in home page, you should see the extension loaded. Dev extensions should have a DEV tag.
For now, you can only have one dev path. In the future, we may support multiple dev paths.
Edit Manifest
KK uses package.json to define an extension.
See Manifest for more details.
You need to edit the name, description, identifier and icon of your extension.
Permissions
KK provides many APIs within @kksh/api package. See API Docs for more details.
Most of them requires adding corresponding permissions in package.json.
For example, if you want to read clipboard text, you need to add clipboard:read-text permission in package.json, under kunkun.permissions field.
See Extension Permissions for a full list of permissions, and API docs for each API to see how to add permissions.
Some permissions are just a single string, some are scoped permissions.
Start Coding
It is recommended to use pnpm for development because when the extension is built in our CI, it is also built with pnpm.
pnpm installpnpm build # build the extension, generate dist/index.js file, this is the entry file of the extension, make sure it's listed in the package.jsonpnpm dev # start the development server, basically running `build` with watch modeIn dev mode (pnpm dev), every time you save the file, the extension will be recompiled and Kunkun desktop app will be notified to reload the extension.
Otherwise you need to manually reload the extension.
A template worker extension should extends abstract class WorkerExtension (https://docs.api.kunkun.sh/classes/ui_worker.WorkerExtension)
Override the methods of this class to implement your extension.
loadonSearchTermChangeonActionSelectedonEnterPressedOnSearchBar
List View
onListItemSelectedonListScrolledToBottomonHighlightedListItemChanged
Form View
onFormSubmit
import { expose, WorkerExtension } from "@kksh/api/ui/worker"
class DemoExtension extends WorkerExtension {  async load() {    // load method is run when the extension is loaded, you can use it as an initializer  }}
expose(new DemoExtension()) // expose this extension at the bottom of the file
There is no concept like routing in worker template extension. Different views can be rendered with ui.render() method.
You can add any variables to the Extension class to keep track of the state and render different views based on the state.
Once the command is built, a js file will be generated at dist/index.js.
Refresh kunkun app, you should see the command.
Advanced Usage
The scaffold template uses bun to build the extension from TypeScript into JavaScript.
You can install other dependencies (they need to run in web worker), add more .ts files.
Eventually they will be bundled into a single js file and run in web worker.
build.ts in the template project contains the build script, you can modify it as you want,
or replace bun with other build tools like esbuild, rollup, vite, etc.
@rollup/plugin-terser is known to have some problems with the current @kksh/api package.
bun is the simpliest and fastest tool for this job.
Sample Build Script
import { watch } from "fs"import { join } from "path"import { refreshTemplateWorkerExtension } from "@kksh/api/dev"import { $ } from "bun"
async function build() {  await $`bun build --minify --target=browser --outdir=./dist ./src/index.ts`  await refreshTemplateWorkerExtension()}
const srcDir = join(import.meta.dir, "src")
await build()
if (Bun.argv.includes("dev")) {  console.log(`Watching ${srcDir} for changes...`)  watch(srcDir, { recursive: true }, async (event, filename) => {    await build()  })}
Views
Template Command follows templates. Each template is a type of view.
Markdown View
Basically renders markdown on page.
import { expose, Form, ui, WorkerExtension } from "@kksh/api/ui/worker"
class DemoExtension extends WorkerExtension {  load() {    return ui.render(new Markdown("# Hello, World!"))  }  ...}
expose(new DemoExtension())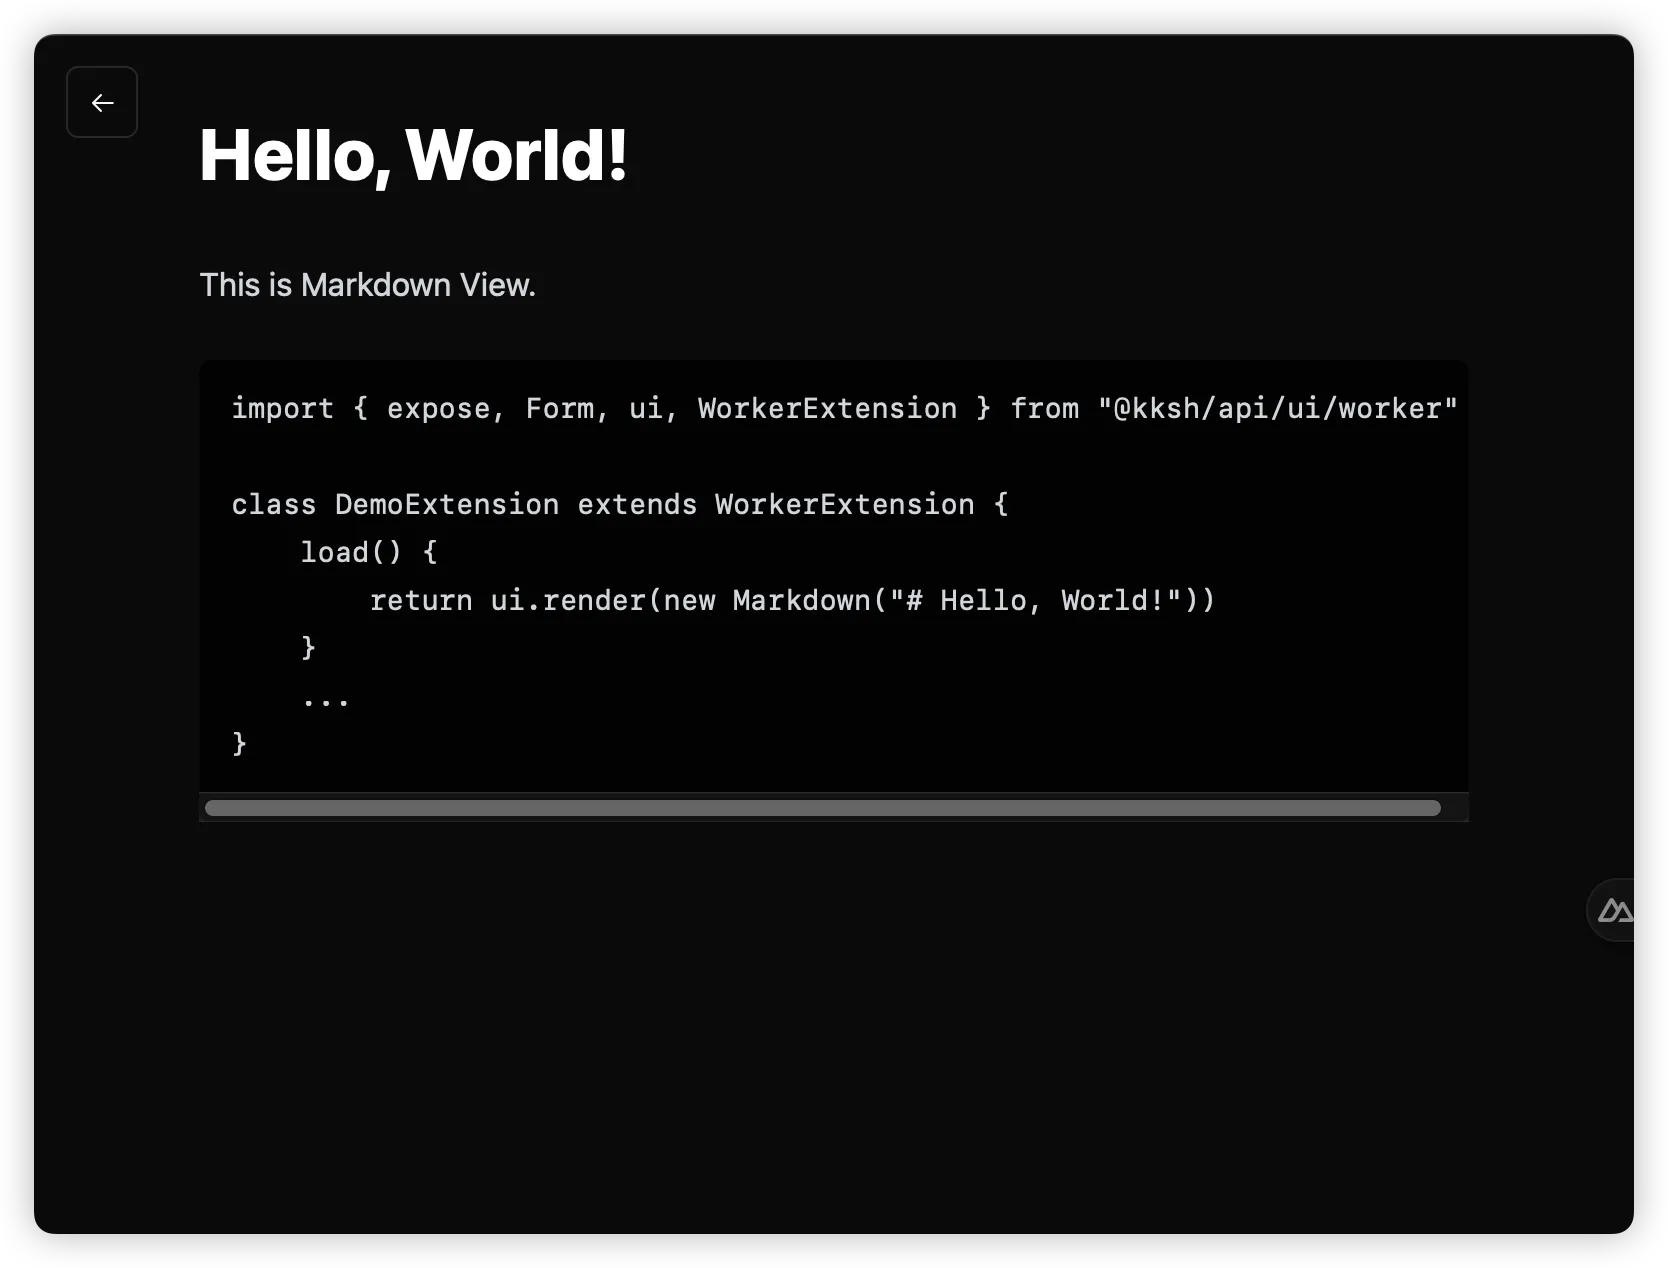
Form View
A form can be easily rendered with the ui API. Every form field is an object.
Available form fields:
Form.InputFieldForm.NumberFieldForm.SelectFieldForm.BooleanFieldForm.DateFieldForm.ArrayFieldForm.Form
import { expose, Form, ui, WorkerExtension } from "@kksh/api/ui/worker"
class DemoExtension extends WorkerExtension {  async onFormSubmit(value: Record<string, any>): Promise<void> {    console.log("Form submitted", value)  }  async load() {    return ui.render(      new Form.Form({        key: "form1",        fields: [          new Form.NumberField({            key: "age",            label: "Age",            placeholder: "Enter your age"          }),          new Form.InputField({            key: "name"          })        ]      })    )  }}expose(new DemoExtension())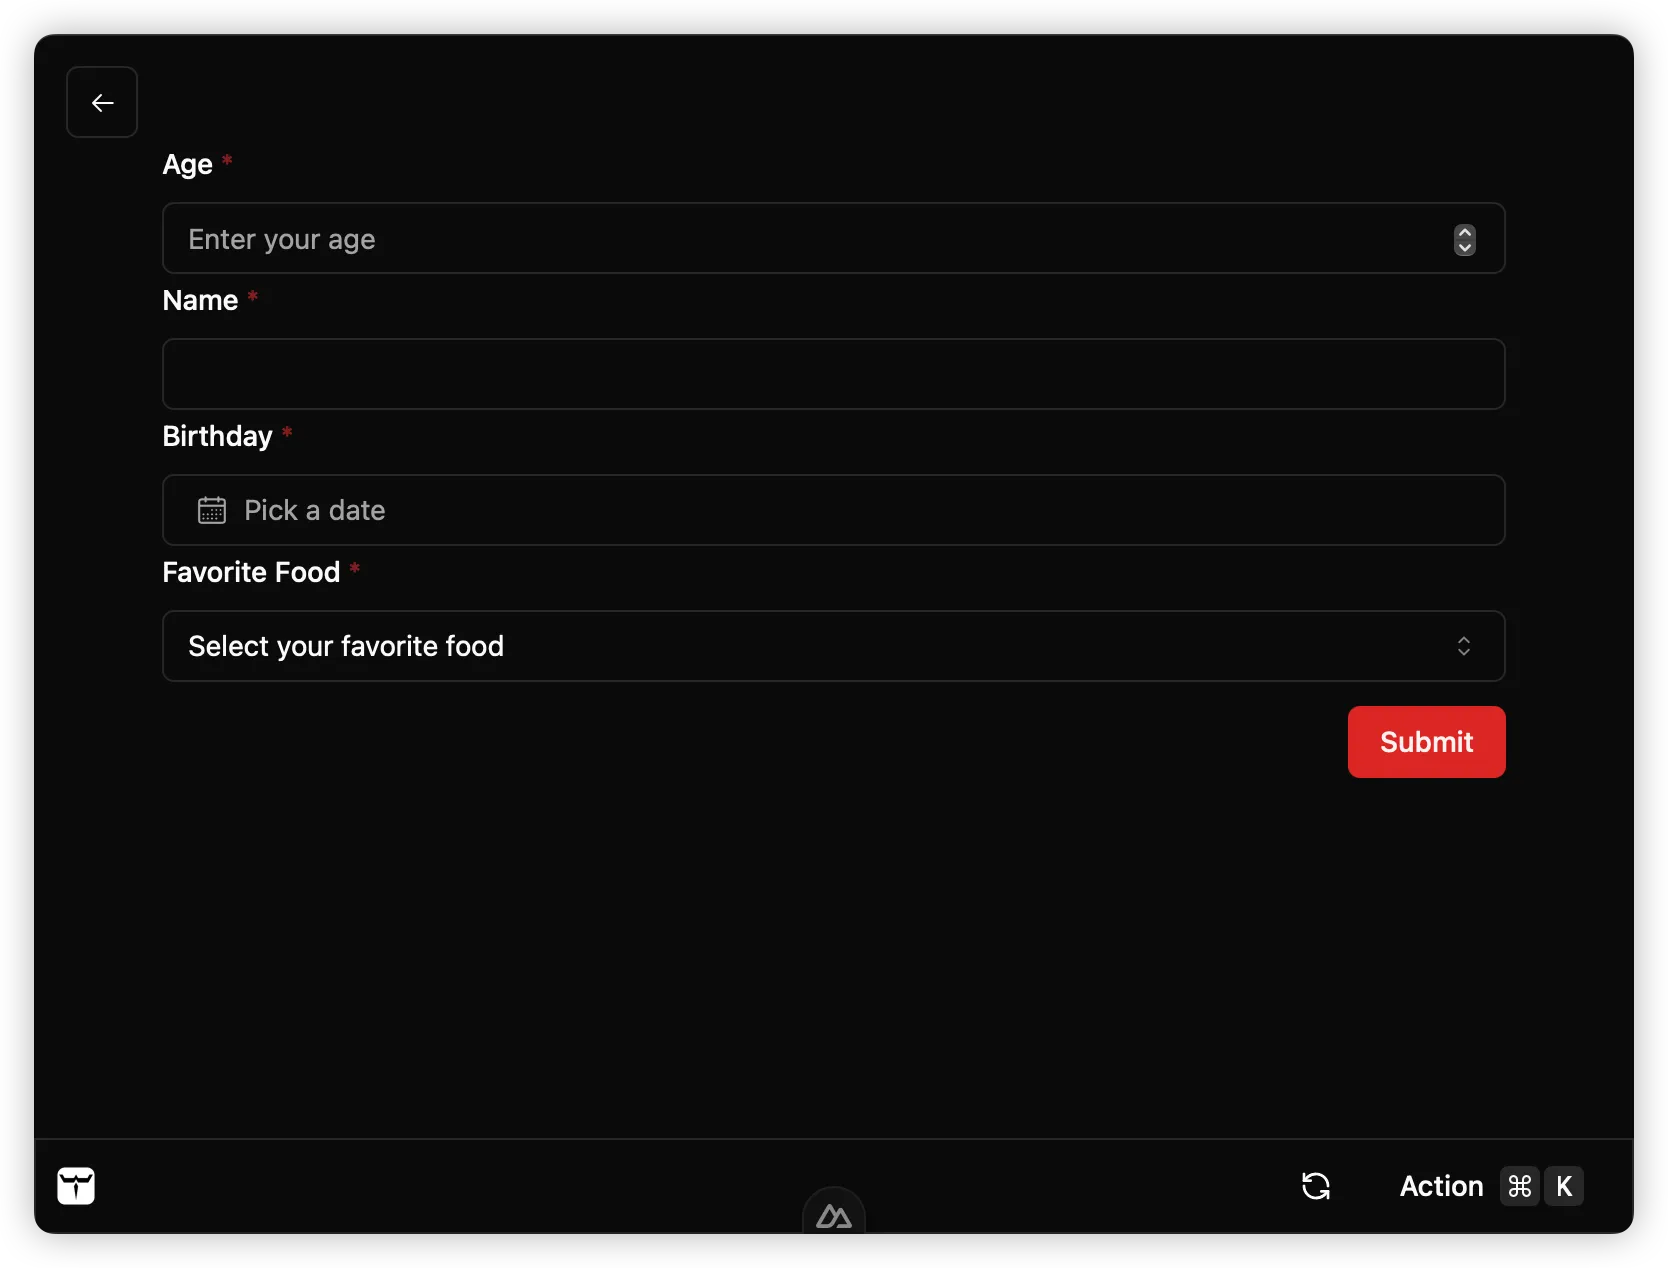
List View
List view can contain sections and items. Everything is an object.
An list item can have title, value, icon and actions.
Each item can contain multiple actions. When selected, onActionSelected() will be called.
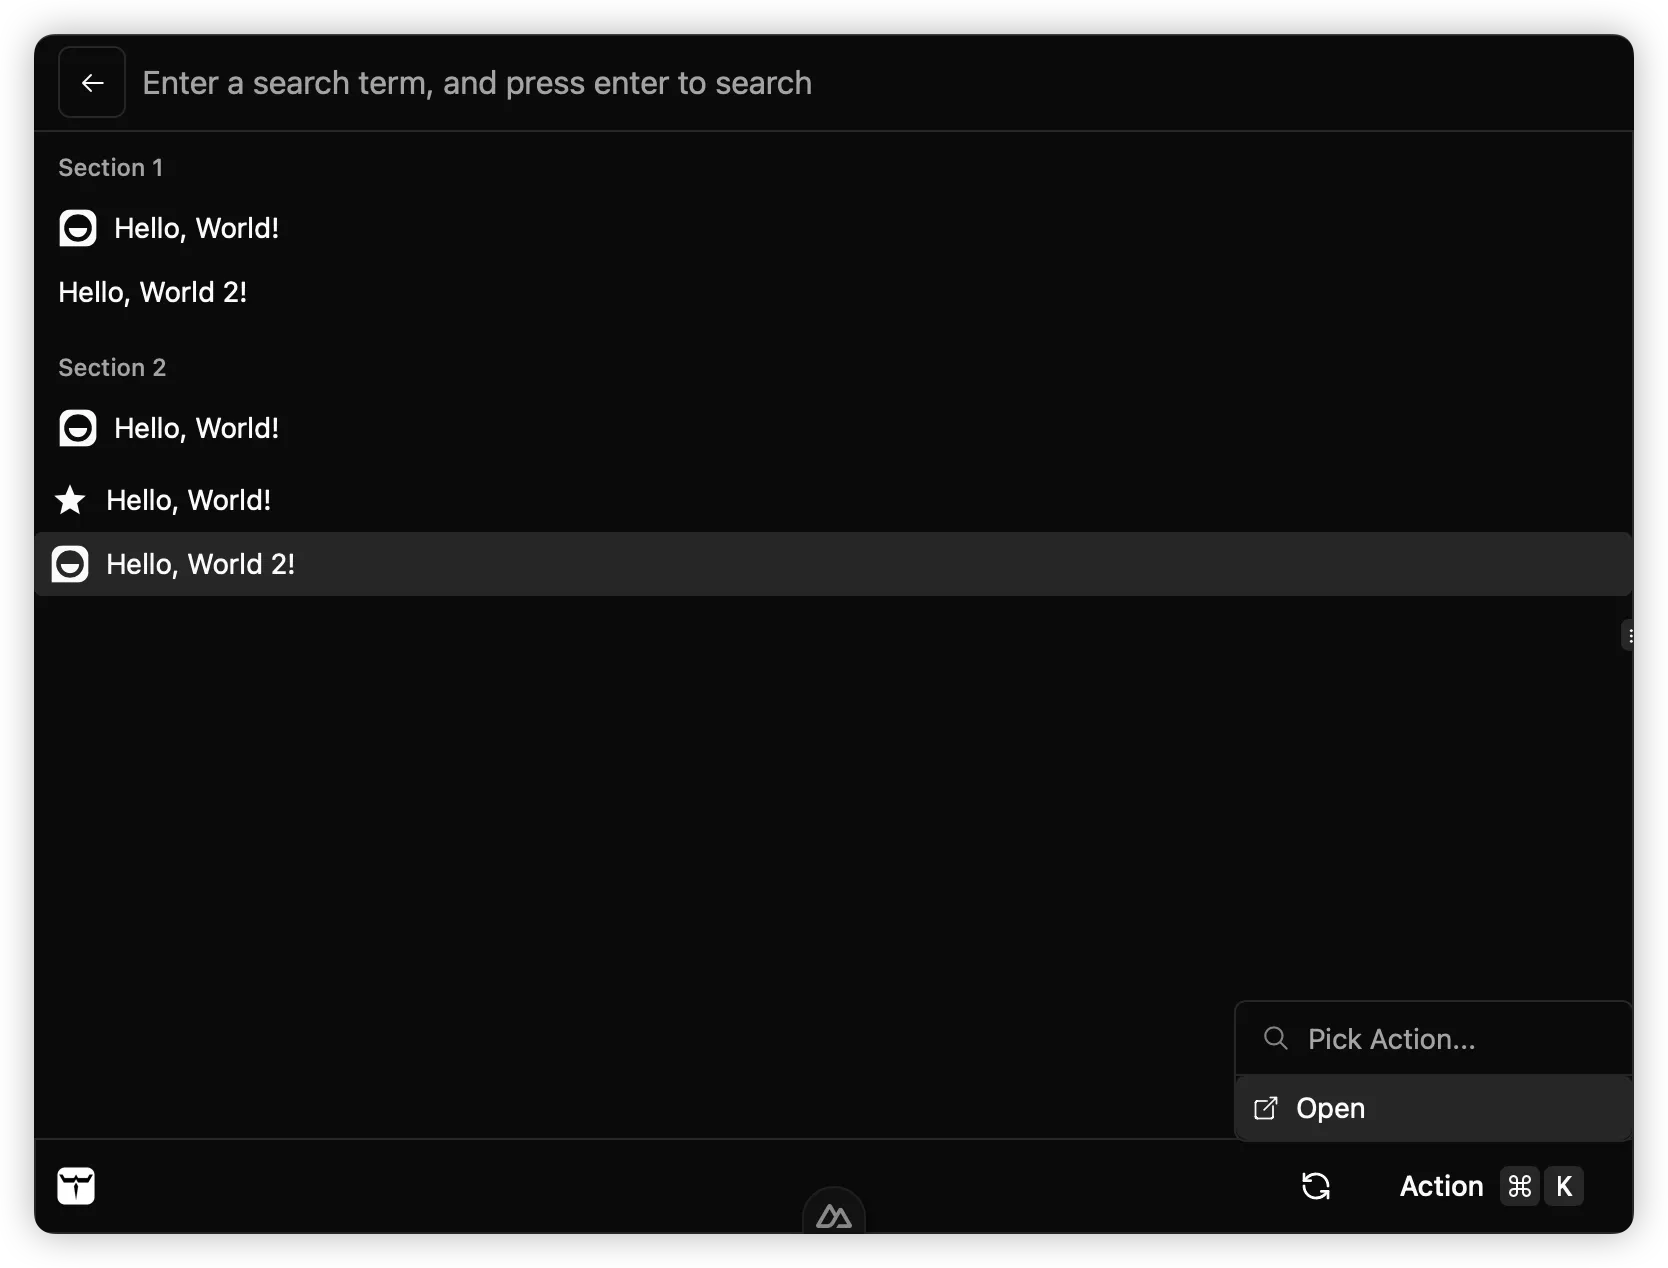
import { Action, expose, Icon, IconEnum, List, ui, WorkerExtension } from "@kksh/api/ui/worker"
class DemoExtension extends WorkerExtension {  async onFormSubmit(value: Record<string, any>): Promise<void> {    console.log("Form submitted", value)  }  async load() {    return ui.setSearchBarPlaceholder("Enter search term").then(() => {      return ui.render(        new List.List({          sections: [            new List.Section({              title: "Section 1",              items: [                new List.Item({                  title: "Hello, World!",                  value: "Section 1 Hello, World!",                  icon: new Icon({ type: IconEnum.Iconify, value: "gg:hello" })                }),                new List.Item({ title: "Hello, World 2!", value: "Section 1 Hello, World 2!" })              ]            }),            new List.Section({              title: "Section 2",              items: [                new List.Item({                  title: "Hello, World!",                  value: "Section 2 Hello, World!",                  icon: new Icon({ type: IconEnum.Iconify, value: "gg:hello" })                })              ]            })          ],          items: [            new List.Item({              title: "Hello, World!",              value: "Hello, World!",              icon: new Icon({ type: IconEnum.Iconify, value: "ri:star-s-fill" })            }),            new List.Item({              title: "Hello, World 2!",              value: "Hello, World 2!",              icon: new Icon({ type: IconEnum.Iconify, value: "gg:hello" }),              actions: new Action.ActionPanel({                items: [                  new Action.Action({                    title: "Open",                    icon: new Icon({ type: IconEnum.Iconify, value: "ion:open-outline" })                  })                ]              })            })          ]        })      )    })  }
  async onSearchTermChange(term: string): Promise<void> {    console.log("Search term changed to:", term)  }
  async onItemSelected(value: string): Promise<void> {    console.log("Item selected:", value)  }
  async onActionSelected(value: string): Promise<void> {    console.log("Action selected:", value)  }}expose(new DemoExtension())
To verify the extension, you need to build it and run the verification command.
To make sure the build environment is consistent, docker is required to run the build command.
npx @kksh/cli build # requires dockernpx @kksh/cli verify --publishThese commands verify whether the extension can be loaded and published to the extension store.
To verify the functionality in production build,
-
Set Dev Extension Load Mode to
Production Modein settings, general tab. -
Run
npm run build -
Try to load the dev extension in KK, i.e. Search for your dev extension and select it to see if the UI can be loaded.
-
Make sure
filesfield inpackage.jsononly includes necessary files. e.g."files": ["dist"]. -
Run
npm packto generate a tarball file.- Decompress the tarball file to see if only necessary files are included.
-
Go to settings page, developer tab, drag and drop the tarball file to install the extension.
- The tarball file is decompressed to the dev extension path.
- You may want to change the dev extension path as the new extension will be installed in the dev extension path as well, where your dev project is. And 2 extensions with the same identifier will be loaded.
-
Check to see if the extension UI can be loaded in KK.
Publish
For now, send a PR to KunkunExtensions.
Add the source code in extensions/ folder of this repo.
To update the extension and republish, just update the version in package.json and send a PR again.
When the version is updated, CI will auto publish the extension to the extension store.